Well, Friends... I have failed you. This was an extremely labor-intensive project, but I failed to take pics as I went along. For one thing, once I had grease and metal filings on my hands, I didn't want to handle my camera... That and when I dived in and saw progress, I couldn't bring myself to stop.
So look to the pics above and notice the "pebble" texture seen on the barrel. Like it was investment cast and not finished up. I hand polished all that smooth. And it took quite a while! The brass grip frame was also a casting, but was much easier to polish. I finished all the hand polishing with a felt bob and Simichrome. ( FELT bob - not sponge bob

) Wore out two felt bobs - they flat fell apart - but it made a difference. Really spiffed up the brass.
In the top pic you can see how bubba went through the motions of checkering it. Fortunately, the grips were oversize and I was able to sand 95% of those marks out.
The steel frame was badly scored. I took my mill bastage file to those tracks and quickly discovered the frame wasn't in square. Must have warped a bit when heat treated. So it was file, file, file... polish, polish, polish until everything looked kinda sorta close to done.
A fellow forum member and friend offered to dunk it in a hot tank, but since it's really supposed to be color cased - and for SiL who is easily amused - I just went with cold blue. Close enough for RR work.
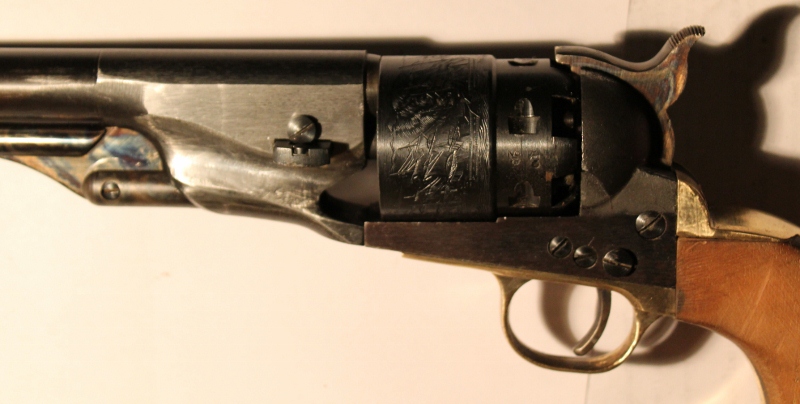
This pic shows the assembled revolver. Compare the barrel assembly to the pic above. Luckily, I was able to remove all the "pebble finish" left from the casting and smooth it down.
 project1 002 (800x404).jpg [ 169.54 KiB | Viewed 9192 times ]
Same scenario - opposite side
 project1 004 (800x604).jpg [ 219.32 KiB | Viewed 9192 times ]
Another shot showing the smoother work areas - also the smoother grips.
 project1 007 (800x472).jpg [ 185.72 KiB | Viewed 9192 times ]
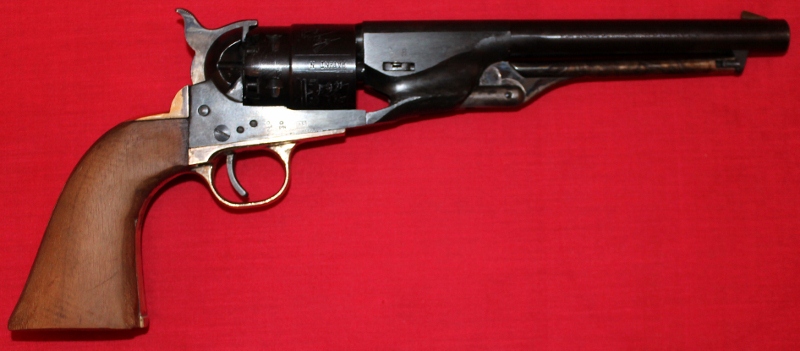
Revolver after mucho cold blue, BLO and hand rubbing to luster
 project1 010 (800x351).jpg [ 147.43 KiB | Viewed 9192 times ]
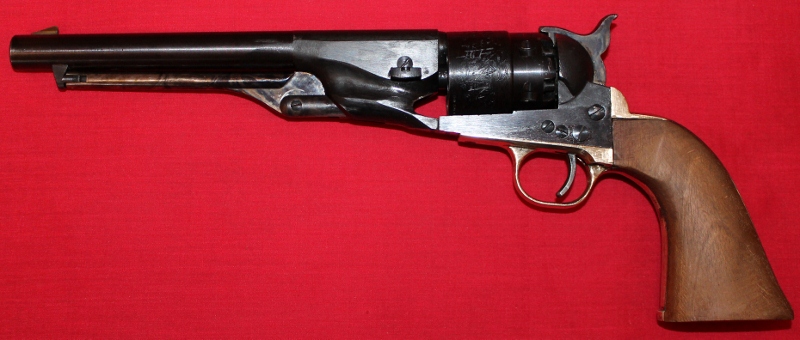
Other side of blued and hand polished revolver
 project1 011 (800x340).jpg [ 170.76 KiB | Viewed 9192 times ]
Again, please forgive me for not taking pics as I went along. Once I started seeing actual progress, I just couldn't bring myself to stop. Overall it turned out better than I anticipated. I didn't think the pebble surface would be curable. I think at the factory they have dedicated jigs for this work - like just clamp the part in the jig and wail away.
You know... Buffalo Arms offers a 45 Schofield cartridge cylinder for this model... I think I'll tell SiL he can have this or the $. It really wouldn't take a lot of filing to open up the frame for the cylinder w/ loading gate!

So what did I use? The 8" mill bastage file shown above - a metric crap-ton of masking tape to keep from messing up adjoining surfaces - a round single cut bastage file - the Cratex flexible abrasive kit. No Dremel for those - I hand rubbed the pebbling from the steel - I did use the Dremel and felt bobs to final polish with Simichrome. You pretty much need a tube o' that. You also need a case of OCD to keep going when nothing looks like it will turn out.
More pics next time! I promise!

SW