[phpBB Debug] PHP Warning: in file [ROOT]/includes/bbcode.php on line 483: preg_replace(): The /e modifier is no longer supported, use preg_replace_callback instead
[phpBB Debug] PHP Warning: in file [ROOT]/includes/bbcode.php on line 483: preg_replace(): The /e modifier is no longer supported, use preg_replace_callback instead
[phpBB Debug] PHP Warning: in file [ROOT]/includes/bbcode.php on line 483: preg_replace(): The /e modifier is no longer supported, use preg_replace_callback instead
[phpBB Debug] PHP Warning: in file [ROOT]/includes/bbcode.php on line 483: preg_replace(): The /e modifier is no longer supported, use preg_replace_callback instead
[phpBB Debug] PHP Warning: in file [ROOT]/includes/bbcode.php on line 483: preg_replace(): The /e modifier is no longer supported, use preg_replace_callback instead
[phpBB Debug] PHP Warning: in file [ROOT]/includes/bbcode.php on line 483: preg_replace(): The /e modifier is no longer supported, use preg_replace_callback instead
[phpBB Debug] PHP Warning: in file [ROOT]/includes/bbcode.php on line 483: preg_replace(): The /e modifier is no longer supported, use preg_replace_callback instead
[phpBB Debug] PHP Warning: in file [ROOT]/includes/bbcode.php on line 483: preg_replace(): The /e modifier is no longer supported, use preg_replace_callback instead
[phpBB Debug] PHP Warning: in file [ROOT]/includes/bbcode.php on line 483: preg_replace(): The /e modifier is no longer supported, use preg_replace_callback instead
[phpBB Debug] PHP Warning: in file [ROOT]/includes/bbcode.php on line 483: preg_replace(): The /e modifier is no longer supported, use preg_replace_callback instead
[phpBB Debug] PHP Warning: in file [ROOT]/includes/bbcode.php on line 483: preg_replace(): The /e modifier is no longer supported, use preg_replace_callback instead
[phpBB Debug] PHP Warning: in file [ROOT]/includes/bbcode.php on line 483: preg_replace(): The /e modifier is no longer supported, use preg_replace_callback instead
[phpBB Debug] PHP Warning: in file [ROOT]/includes/bbcode.php on line 483: preg_replace(): The /e modifier is no longer supported, use preg_replace_callback instead
[phpBB Debug] PHP Warning: in file [ROOT]/includes/bbcode.php on line 483: preg_replace(): The /e modifier is no longer supported, use preg_replace_callback instead
[phpBB Debug] PHP Warning: in file [ROOT]/includes/bbcode.php on line 483: preg_replace(): The /e modifier is no longer supported, use preg_replace_callback instead
[phpBB Debug] PHP Warning: in file [ROOT]/includes/bbcode.php on line 483: preg_replace(): The /e modifier is no longer supported, use preg_replace_callback instead
[phpBB Debug] PHP Warning: in file [ROOT]/includes/bbcode.php on line 483: preg_replace(): The /e modifier is no longer supported, use preg_replace_callback instead
[phpBB Debug] PHP Warning: in file [ROOT]/includes/bbcode.php on line 483: preg_replace(): The /e modifier is no longer supported, use preg_replace_callback instead
[phpBB Debug] PHP Warning: in file [ROOT]/includes/bbcode.php on line 483: preg_replace(): The /e modifier is no longer supported, use preg_replace_callback instead
[phpBB Debug] PHP Warning: in file [ROOT]/includes/bbcode.php on line 483: preg_replace(): The /e modifier is no longer supported, use preg_replace_callback instead
[phpBB Debug] PHP Warning: in file [ROOT]/includes/bbcode.php on line 483: preg_replace(): The /e modifier is no longer supported, use preg_replace_callback instead
[phpBB Debug] PHP Warning: in file [ROOT]/includes/bbcode.php on line 483: preg_replace(): The /e modifier is no longer supported, use preg_replace_callback instead
[phpBB Debug] PHP Warning: in file [ROOT]/includes/bbcode.php on line 483: preg_replace(): The /e modifier is no longer supported, use preg_replace_callback instead
[phpBB Debug] PHP Warning: in file [ROOT]/includes/bbcode.php on line 483: preg_replace(): The /e modifier is no longer supported, use preg_replace_callback instead
[phpBB Debug] PHP Warning: in file [ROOT]/includes/bbcode.php on line 483: preg_replace(): The /e modifier is no longer supported, use preg_replace_callback instead
[phpBB Debug] PHP Warning: in file [ROOT]/includes/bbcode.php on line 483: preg_replace(): The /e modifier is no longer supported, use preg_replace_callback instead
[phpBB Debug] PHP Warning: in file [ROOT]/includes/bbcode.php on line 112: preg_replace(): The /e modifier is no longer supported, use preg_replace_callback instead
[phpBB Debug] PHP Warning: in file [ROOT]/includes/functions.php on line 4676: Cannot modify header information - headers already sent by (output started at [ROOT]/includes/functions.php:3815)
[phpBB Debug] PHP Warning: in file [ROOT]/includes/functions.php on line 4678: Cannot modify header information - headers already sent by (output started at [ROOT]/includes/functions.php:3815)
[phpBB Debug] PHP Warning: in file [ROOT]/includes/functions.php on line 4679: Cannot modify header information - headers already sent by (output started at [ROOT]/includes/functions.php:3815)
[phpBB Debug] PHP Warning: in file [ROOT]/includes/functions.php on line 4680: Cannot modify header information - headers already sent by (output started at [ROOT]/includes/functions.php:3815)
Yesterday's Weapons Forums :: View topic - Finishing up a revolver kit
Yesterday's Weapons Forums
http://www.yesterdaysweapons.com/phpBB3/

Finishing up a revolver kit
http://www.yesterdaysweapons.com/phpBB3/viewtopic.php?f=58&t=11545
Page 1 of 1

Author:  NebrHogger [ Wed Dec 05, 2012 9:21 pm ]
Post subject:  Finishing up a revolver kit

I got this from gunborker - a mostly finished 1860 C&B. Timing & lockup are spot on, but it's a trifle rough. Starts out like-a this-a:
zKit1.jpg
zKit1.jpg [ 87.06 KiB | Viewed 9162 times ]

zKit3.jpg
zKit3.jpg [ 122.74 KiB | Viewed 9162 times ]


Here we see how rough the sides are:
Smoooth 001 (800x628).jpg
Smoooth 001 (800x628).jpg [ 257.25 KiB | Viewed 9162 times ]

Smoooth 002 (800x531).jpg
Smoooth 002 (800x531).jpg [ 264.03 KiB | Viewed 9162 times ]


Please pass the mill bastage file! :bigrin:
Smoooth 004 (800x585).jpg
Smoooth 004 (800x585).jpg [ 231.12 KiB | Viewed 9162 times ]


And flexible abrasives for hand polishing out file tracksl
Smoooth 005 (800x533).jpg
Smoooth 005 (800x533).jpg [ 274.66 KiB | Viewed 9161 times ]


After mucho back-n-forth mit der file, we have achieved smoothness.
Smoooth 006 (800x451).jpg
Smoooth 006 (800x451).jpg [ 241.58 KiB | Viewed 9161 times ]

Smoooth 007 (800x533).jpg
Smoooth 007 (800x533).jpg [ 217.32 KiB | Viewed 9161 times ]


Maybe not as smooth as Britney's butt cheeks, but close enough for RR work. ;) ;) :bigrin: Also close enough for SiL. More posts tomorrow as the project progesses. SW

Attachments:
Smoooth 006 (800x451).jpg
Smoooth 006 (800x451).jpg [ 241.58 KiB | Viewed 9162 times ]
zKit3.jpg
zKit3.jpg [ 122.74 KiB | Viewed 9162 times ]

Author:  A square 10 [ Wed Dec 05, 2012 9:36 pm ]
Post subject:  Re: Finishing up a revolver kit

thats looking much better , i envey you ..

always wanted to do a project like this but dont feel adequately tallented and am generally short on time ,

Author:  NebrHogger [ Wed Dec 05, 2012 9:50 pm ]
Post subject:  Re: Finishing up a revolver kit

I don't have time, either! Or talent! It's just a matter of jumping in - once you get your feet wet, there's no turning back! :bigrin: SW

Author:  NebrHogger [ Fri Dec 07, 2012 7:35 pm ]
Post subject:  Re: Finishing up a revolver kit

Well, Friends... I have failed you. This was an extremely labor-intensive project, but I failed to take pics as I went along. For one thing, once I had grease and metal filings on my hands, I didn't want to handle my camera... That and when I dived in and saw progress, I couldn't bring myself to stop.

So look to the pics above and notice the "pebble" texture seen on the barrel. Like it was investment cast and not finished up. I hand polished all that smooth. And it took quite a while! The brass grip frame was also a casting, but was much easier to polish. I finished all the hand polishing with a felt bob and Simichrome. ( FELT bob - not sponge bob ;) ) Wore out two felt bobs - they flat fell apart - but it made a difference. Really spiffed up the brass.

In the top pic you can see how bubba went through the motions of checkering it. Fortunately, the grips were oversize and I was able to sand 95% of those marks out.

The steel frame was badly scored. I took my mill bastage file to those tracks and quickly discovered the frame wasn't in square. Must have warped a bit when heat treated. So it was file, file, file... polish, polish, polish until everything looked kinda sorta close to done.

A fellow forum member and friend offered to dunk it in a hot tank, but since it's really supposed to be color cased - and for SiL who is easily amused - I just went with cold blue. Close enough for RR work.

This pic shows the assembled revolver. Compare the barrel assembly to the pic above. Luckily, I was able to remove all the "pebble finish" left from the casting and smooth it down.
project1 002 (800x404).jpg
project1 002 (800x404).jpg [ 169.54 KiB | Viewed 9145 times ]


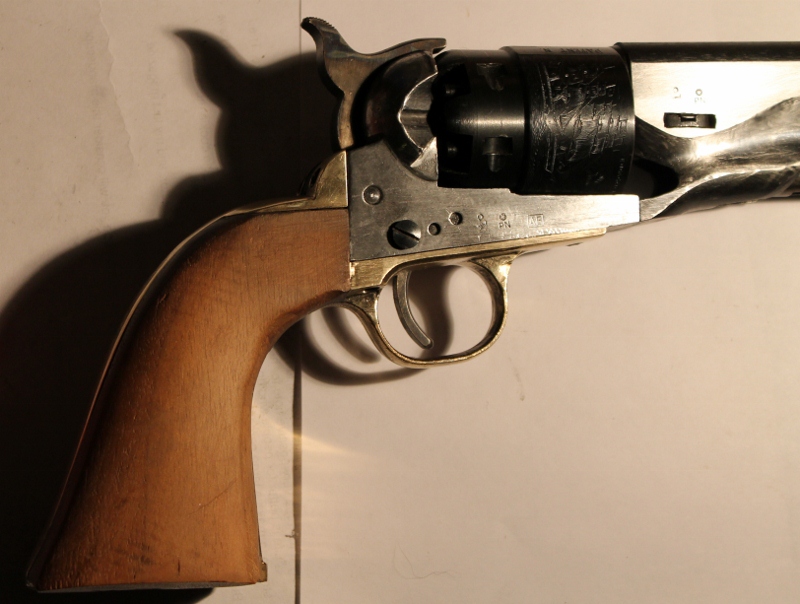
Same scenario - opposite side
project1 004 (800x604).jpg
project1 004 (800x604).jpg [ 219.32 KiB | Viewed 9145 times ]


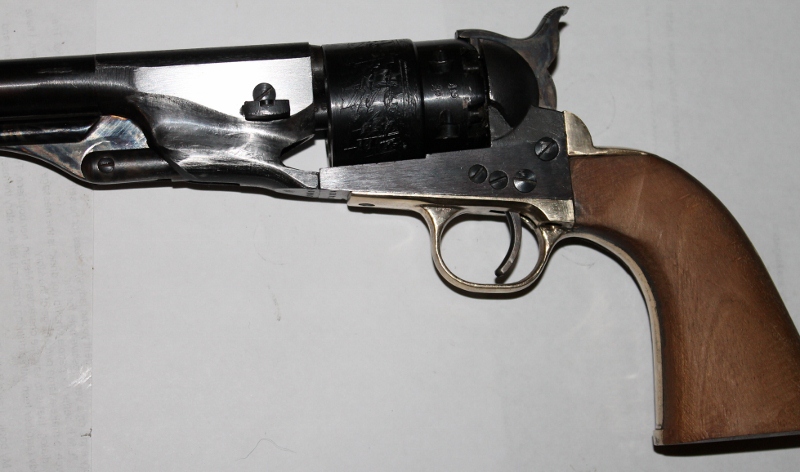
Another shot showing the smoother work areas - also the smoother grips.
project1 007 (800x472).jpg
project1 007 (800x472).jpg [ 185.72 KiB | Viewed 9145 times ]


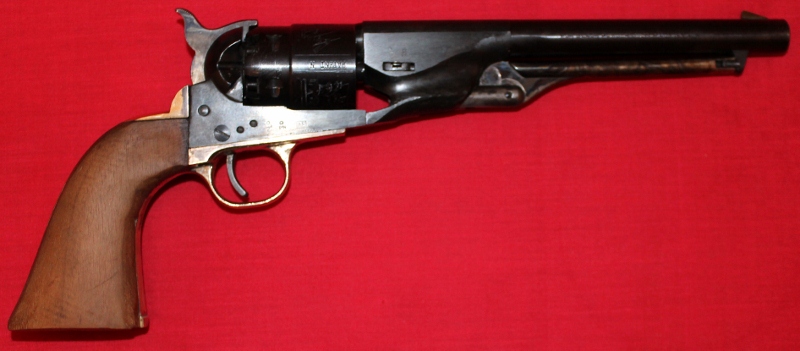
Revolver after mucho cold blue, BLO and hand rubbing to luster
project1 010 (800x351).jpg
project1 010 (800x351).jpg [ 147.43 KiB | Viewed 9145 times ]


Other side of blued and hand polished revolver
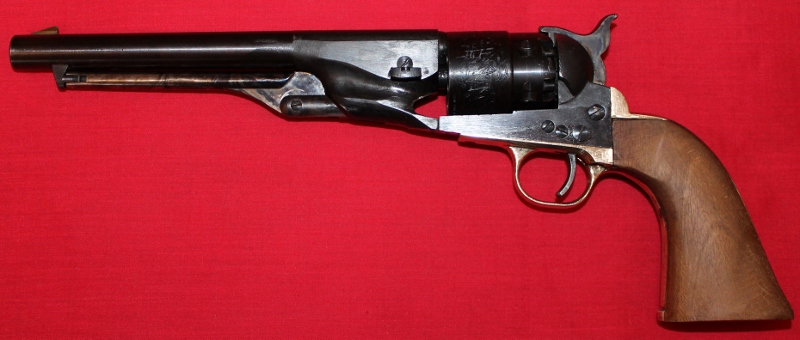
project1 011 (800x340).jpg
project1 011 (800x340).jpg [ 170.76 KiB | Viewed 9145 times ]


Again, please forgive me for not taking pics as I went along. Once I started seeing actual progress, I just couldn't bring myself to stop. Overall it turned out better than I anticipated. I didn't think the pebble surface would be curable. I think at the factory they have dedicated jigs for this work - like just clamp the part in the jig and wail away.

You know... Buffalo Arms offers a 45 Schofield cartridge cylinder for this model... I think I'll tell SiL he can have this or the $. It really wouldn't take a lot of filing to open up the frame for the cylinder w/ loading gate! 8-)

So what did I use? The 8" mill bastage file shown above - a metric crap-ton of masking tape to keep from messing up adjoining surfaces - a round single cut bastage file - the Cratex flexible abrasive kit. No Dremel for those - I hand rubbed the pebbling from the steel - I did use the Dremel and felt bobs to final polish with Simichrome. You pretty much need a tube o' that. You also need a case of OCD to keep going when nothing looks like it will turn out.

More pics next time! I promise! :bigrin: SW

Author:  Herr Mario [ Fri Dec 07, 2012 8:22 pm ]
Post subject:  Re: Finishing up a revolver kit

....SiL not deserving ...send to me...!!! :grin: :grin: :grin: :grin: :grin:

....nice job... ;) :Dbounce:

Author:  rebel49 [ Sat Dec 08, 2012 2:02 am ]
Post subject:  Re: Finishing up a revolver kit

Cold blue did a great job. I have some around here that I did in Oxpho-blue 20 years ago that still look great. Rust blued some of my own and a lot for customers, but just to labor intensive for me.
Great Job Bud! Now on to the next project.

Author:  OlTom [ Sat Dec 08, 2012 7:58 am ]
Post subject:  Re: Finishing up a revolver kit

:Dbounce:
that has a tomtom approval factor of 10!
Image

working brass will spoil you....cause the steel parts are a B*($#H sometimes....slow and painful to get smooth by hand........

looks great!....now to go shoot??......... :P

Author:  NebrHogger [ Sat Dec 08, 2012 11:29 am ]
Post subject:  Re: Finishing up a revolver kit

I probably won't shoot it - I'm too cheep to buy a box o' balls. Something else I thought of - and that you already know - it is NOT easy to polish like that and keep sharp edges. Somehow it worked out though.

I'd rather be lucky than good. ;) :bigrin: SW

Author:  Et2ss [ Sun Dec 09, 2012 12:48 am ]
Post subject:  Re: Finishing up a revolver kit

I am truly impressed kameraden

Author:  A square 10 [ Mon Dec 10, 2012 1:23 pm ]
Post subject:  Re: Finishing up a revolver kit

i understand about the photos , i would not handle the camera while i was working either , you did a nice job of saving this one , tell me about the cylinder engraving

Author:  NebrHogger [ Mon Dec 10, 2012 3:23 pm ]
Post subject:  Re: Finishing up a revolver kit

The cyl just has the roll mark from the factory. It was pretty much finished so I left well enough alone & didn't monkey around with it. SW

Author:  A square 10 [ Mon Dec 10, 2012 3:41 pm ]
Post subject:  Re: Finishing up a revolver kit

Ok , it looked a little like some kind of scene that i could not make out from the photos , i thought maybe you were trying your hand at engraving ,

Author:  NebrHogger [ Mon Dec 10, 2012 3:51 pm ]
Post subject:  Re: Finishing up a revolver kit

Shoot... if I could engrave, I wouldn't have to beat my butt up & down the rail. I'd go pards with kaintuck making flintgrinders! :bigrin: SW

Author:  Et2ss [ Mon Dec 10, 2012 11:22 pm ]
Post subject:  Re: Finishing up a revolver kit


Author:  A square 10 [ Tue Dec 11, 2012 11:01 am ]
Post subject:  Re: Finishing up a revolver kit

ahhh , so it wasnt just my old eyes playin tricks on me , thanks i learned something new again ,

Page 1 of 1 All times are UTC - 5 hours [ DST ]
Powered by phpBB® Forum Software © phpBB Group
http://www.phpbb.com/